
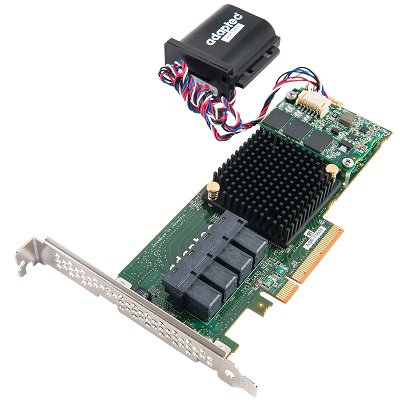
Adaptec Series 7 Raid Controllers and VMware ESXi 5.1
Generally at Crucial we are a Xen house, with all of our production servers running either Xen or Citrix XenServer Hypervisors. However, our tech gurus are adept with the many flavours on the Hypervisor rainbow and for various non-critical or non-production systems we do make use of other HV’s, including VMware ESXi nodes.
With Xen & XenServer being so closely linked to RHEL/CentOS, monitoring the status of the underlying RAID controller has never really been an issue. One of the more annoying issues with ESXi up until the last 1-2 years, was the inability to monitor the status of your RAID card without rebooting and checking via the RAID BIOS — which is inconvenient to say the least in today’s highly available world.
Thankfully this was addressed around the release of ESXi 5.0, with vendors such as Adaptec finally being able to release aacraid drivers for ESXi and specific drivers to allow for a “remote-arcconf” utility (Adaptec Raid Controller Configuration utility). The ESXi version allowed you to “remotely” monitor the RAID controller status by communicating with the underlying hypervisor via the virtual machine layer ie. any virtual machine with the utility installed and the right credentials could talk directly to the server’s RAID controller. Of course from there, you could integrate into whatever automated monitoring system you use, ie. Nagios, for automated alerts of disk or RAID issues.
With more recent Adaptec cards such as the series 6 & 7 range, these newer cards require a few more steps to get working ‘out-of-the-box’. The arcconf & remote-arcconf utilities have also evolved with newer cards, expanding into the bloatier “MaxView Storage Manager” utility. More features, more problems!
The following article will detail getting the latest version of ESXi 5.1 running with monitoring on an Adaptec Series 7 (or Series 6) card.
Part A.) VMware ESXi 5.1 Custom Image Build with Adaptec aacraid drivers
The first thing you should know is that you won’t have the previous versions of ESXi or the current ESXi 5.1 running ‘out of the box’ with an Adaptec Series 7 card or series 6 for that matter. You will need to manually create a VMware ESXi installation .iso with the correct aacraid driver included for your RAID card.
Visit the Adaptec Support Downloads page for your Series 7 card & Click “VMware ESXi 5”. Here you will find the latest available aacraid drivers for your card to work with ESXi 5.1. Once you have the aacraid drivers, follow the steps below:
VMware ESXi 5.1 ImageBuilder Instructions for Adaptec Controllers
1.) If not already installed download Microsoft PowerShell and Microsoft .NET 2.0 and install on your Windows build machine. Available from the Microsoft Download Center at www.microsoft.com/download
2.) Run PowerShell as Administrator and set the execution policy to RemoteSigned:
PowerShell> Set-ExecutionPolicy RemoteSigned
Close the PowerShell window.
3.) Download and install “vSphere PowerCLI” on your Windows build machine. Available from the VMware Download Center at www.vmware.com/downloads (as of this writing it was VMware-PowerCLI-5.1.0-793510.exe). Note: You will need account credentials to download from the VMware website
4.) Download the “VMware ESXi5.1 Standard Software Depot” (as of this writing it was VMware-ESXi-5.1.0-799733-depot.zip). Do not unzip, move to a temporary location on your Windows build machine (for example c:\vm).
5.) Copy aacraid-esxi5.1-1.2.1.30200.zip to the directory on the Windows machine where the file downloaded in Step 4 is stored (eg. c:\vm).
6.) Launch the vSphere PowerCLI. Change to the above mentioned directory (example: cd c:\vm).
7.) Add the software depots.
PowerCLI c:\vm> Add-EsxSoftwareDepot .\VMware-ESXi-5.1.0-799733-depot.zip
PowerCLI c:\vm> Add-EsxSoftwareDepot .\aacraid-esxi5.1-1.2.1.30200.zip
8.) Check the profiles.
PowerCLI c:\vm> Get-EsxImageProfile
You should see something like this:
ESXi-5.1.0-799733-no-tools
ESXi-5.1.0-799733-standard
9.) Create a copy of the standard image profile and set the acceptance level.
PowerCLI c:\vm> New-EsxImageProfile –CloneProfile ESXi-5.1.0-799733-standard –Name Image1–AcceptanceLevel VMwareCertified
When prompted for “Vendor” enter PMC Sierra
10.) Check to see that the new driver package is available.
PowerCLI c:\vm> Get-EsxSoftwarePackage
There should be something like this in the list: scsi-aacraid 5.1.5.2.1.30200-1OEM.510.0… Adaptec
There will also be an in-box driver by the same name but different version.
11.) Add the new scsi-aacraid software package to the new image profile.
PowerCLI c:\vm> Add-EsxSoftwarePackage –ImageProfile Image1 –SoftwarePackage scsi-aacraid
12.) Export your customized ISO image.
PowerCLI c:\vm> Export-EsxImageProfile –ImageProfile Image1 –FilePath Image1.iso –NoSignatureCheck -ExportToIso
13.) Burn this .iso to a CD, create your RAID Array’s on the Adaptec controller and boot from the CD to install ESXi 5.1 to the array.
Now we have ESXi up & running on your Adaptec Series 7 Card we can begin the last part, monitoring!
Part B.) Configuring ESXi for RAID Monitoring
In order to monitor the underlying RAID Controller on your ESXi 5.1 Hypervisor node, you will need 2 things. Firstly the correct VMware Installation Bundles (VIB’s) installed for Adaptec RAID Controller monitoring via the Common Information Model (CIM) service running on ESXi. Secondly, you will need a virtual machine to install the monitoring software “maxView Storage Manager” for your Adaptec RAID Card.
The VIB’s will have been installed via our custom iso in Part A). However, we just want to check everything is ok on the ESXi 5.1 host
1.) We need to enable SSH access to the ESXi node using either of the following:
From the ESXi host console, select F2 and enter the root password. Select “Troubleshooting Options”, then select “Enable SSH”. Hit ESC twice.
Alternatively, you can connect using the vSphere client. Highlight the hypervisor node in the left-hand pane and click on the ‘Configuration’ tab. Under ‘Software’ click on ‘Security Profile’. Then click on ‘Properties’ for Services. This will give you a list of services and you should see SSH as ‘Stopped’. Click on Options and Start.
2.) Connect to the ESXi host using SSH, entering its IP address and port 22. Log in as root.
3.) Verify that the latest aacraid driver 1.2.1-30200 is installed on the ESXi host (This is what we did when building the custom ESXi installation .iso).
From SSH:
# esxcli software vib list | grep aacraid
scsi-aacraid 5.0.5.2.1.30200-1OEM.510.0.0.799733 Adaptec_Inc
If that Adaptec scsi-aacraid VIB is already installed as expected, things are looking good. If it’s not, you must have installed using magic.
4.) Next we want to check the Adaptec “arcconf” & “arcsmis” VIB’s are installed
SSHclient# esxcli software vib list | grep arc
vmware-esx-provider-arcconf.vib
vmware-esx-provider-arcsmis.vib
We should see something like the above.
Part C.) Installing maxView Storage Manager on a VMware Guest OS
Last but not least, we need a virtual machine to pull the information we need about the underlying RAID controller configuration from the ESXi node.
NOTE: Only the Guest OS versions of maxView Storage Manager can be used with VMware. The Guest OS must be installed on a VM that resides on the ESXi host that contains the controller(s) that are to be monitored.
NOTE: The 32-bit Guest OS versions should not be used on 64-bit VMs.
NOTE: At the time of this writing, Linux Guest OS support is for rpm-based Linux versions only.
1.) Setup a Linux (or Windows) virtual machine as normal. This example will assume a minimal Linux CentOS x64bit VM, 256MB RAM, thin provisioned.
2.) Visit the Adaptec Support Downloads page for your Series 7 card and look for “Storage Manager Downloads”. Here you will find the latest available “maxView Storage Manager” for VMware.
Download the appropriate file and transfer it to your virtual machine via SCP or FTP or Web Browser etc. As of writing latest was “maxView Storage Manager v1.02.20532 for VMware“
3.) For this example, I have downloaded “msm_vmware_v1_02_20532.zip”, unzipped and located the x86_64 guest_os file “StorMan-1.02.esx86_64.bin” and transferred to my VM via SCP.
4.) For a Linux Guest OS, ensure that the execution privileges are enabled for the installation program.
SSHclient# chmod +x ./StorMan-1.02.esx86_64
5. Launch installation.
SSHclient# ./StorMan-1.02.esx86_64.bin
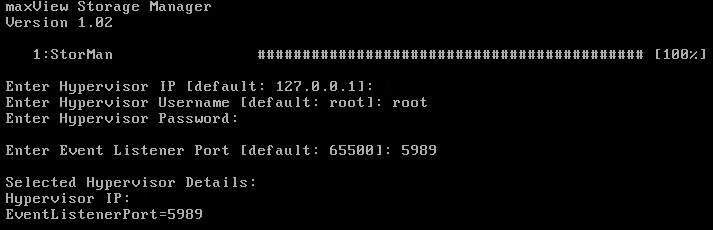
6. Enter the Hypervisor’s IP address, the username root and the root password of the VMware ESXi node (not your VM)
Note: The default EventListenerPort of 65500 may not work. Previous versions of ESXi arcconf used port 5989 which I have specified here without problem. Worst comes to worse you can install once with defaults & test.
If it fails to connect on 65500, install again selecting 5989 as below. You can verify what ports are open for CIM Server & CIM Secure Server by connecting to ESXi node using vSphere >> Configuration >> Security Profile and checking the ports listed under ‘Firewall’
7. Once complete, you can either connect via web browser, either locally from the VM or remotely. For Windows locally, double-click on the maxView icon from the desktop.
For Linux locally, the loopback address can be used.
https://127.0.0.1:8443/maxview/manager/main.xhtml
For Windows or Linux remotely, use this link.
https://<ip-address of VM>:8443/maxview/manager/main.xhtml
Enter as the root user with the root password.
If you are running minimal Linux you can login to the server via SSH client or vSphere console and run the following command which will be far more useful, especially for external monitoring, Nagios etc.
SSHclient# /usr/StorMan/arcconf
This will out put all available commands their usage eg. /usr/StorMan/arcconf getconfig 1
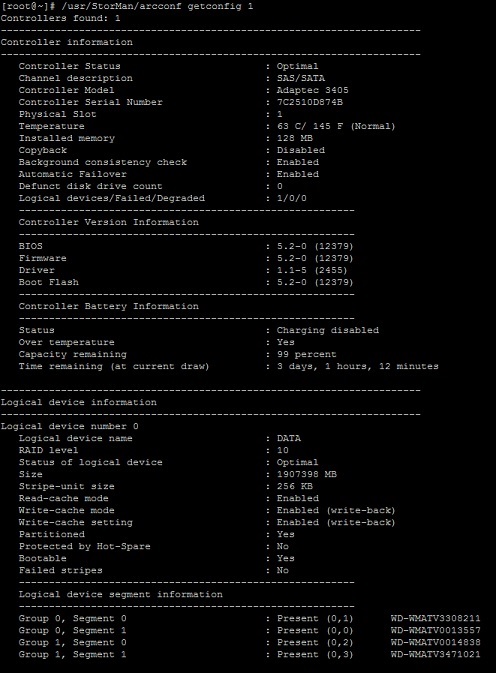
There we have it, Adaptec “remote-arcconf” monitoring and configuration options for an Adaptec Series 7 RAID card using a VM on an ESXi node.
Miscelaneous:
Restarting maxView: In some cases it may be necessary to restart some components in order to see the Adaptec controllers in the web browser.
For a Windows Guest OS, go to Computer Management -> Services. Stop the maxView Web Server, then stop the maxView Storage Manager Agent. Then start the Agent and then start the Web Server.
For a Linux Guest OS:
# service stor_tomcat stop
# service stor_agent stop
# service stor_agent start
# service stor_tomcat start