
A Practical Guide to SNMP, Part 1: The Basics
Over the last 6 years I have worked with many systems all of which required monitoring. In order to achieve this monitoring I have used several techniques from using SNMP, WMI and custom scripts to retrieve the results. I have used several tools and Network Management Servers(NMS).
Using SNMP works in either by polling or receiving trap.
Polling
This is when you have a NMS to poll the client. Its just like asking it a question and getting an answer.
Traps
The client will not communicate with the NMS until something happens. e.g. a Power Supply’s power state changes. This then triggers a trap to be sent to the NMS with these details.
By default the NMS communicates with the client on UDP port 161. Traps are sent to the NMS on UDP port 162.
Network Management Software
There are two pieces of software I use to gain visibility and to provide notification should my hosts or networks have a problem. Nagios and Cacti are both Open Source and are highly flexible and customisable. There are many other paid software you can use, but for Open Source software is by far the best solution for me.
Nagios
This system is great for your NOC monitoring. It polls your monitored systems and will alert based off thresholds. There is no out of the box Graphing, It is your typical Up/Down NMS.
Cacti
This is a great interface which embraces RRD-Tool to store data and produce powerful graphing. You would use Cacti if you wanted to monitor historical Data. There are even additional plugins that can alert based off thresholds.
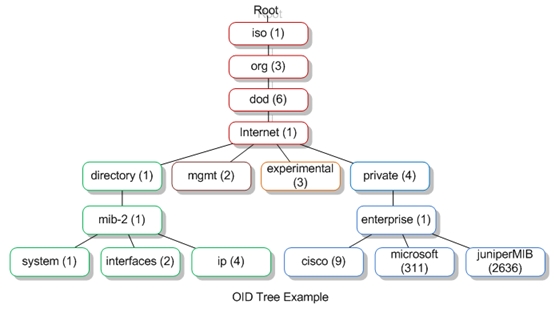
SNMP uses MIBs and OIDs
MIBs in a basic term explains what each of the OIDs are. Its like a database of entry points into the OID tree.
Companies and vendors can register to have an enterprise on the private branch of the OID tree. They can then allocate OIDs under this enterprise. Microsoft for example has an enterprise ID 311. So every thing under .1.3.6.1.4.1.311 belongs to microsoft.
SNMP Security
SNMP uses a security method called communities. Its basically a password that the client sets or the server accepts from when listening for traps.
There are OID’s which are read only and both read and write. You are able to set communities for either getting values, setting values or both.
Walking the tree
By default Linux has the basic set of SNMP OIDs to query. In order to test and workout what you would like to monitor there are several tools to use.
The main tool I use is called snmpwalk. And it basically queries a client by starting at the system OID and walks under it.
snmpwalk -c <community> -v 2c <IP of client> <OID start point>
*The OID start point can be either the dotted OID Value or the word value eg “system”.

Setting up your client
Once you have set up you NMS you will need to configure, enable and secure your client.
1. From a Linux(Redhat based)
By far the easiest way to install snmp onto you host is by using yum. Install the client:
yum install net-snmp
Once installed you will need to configure snmp, the config file is located:
/etc/snmp/snmpd.conf
Simply add:
rocommunity <your-community-name> <the-IP-of the NMS>
Start/Restart SNMP daemon and confirm that the SNMP daemon is set to start on boot:
chkconfig --list| grep snmpd
Confirm that that your desired runlevel is set to on. In my case, I am booting into runlevel 3. To check your runlevel look for the line that contains “id:x:initdefault:” in:
/etc/inittab
With “x” being your runtime level.
| Hosting Options & Info | VPS | Web Solutions & Services |
|---|---|---|