
Managing Shells with Screen
Screen is a great little program on Linux which lets you manage, store and keep your shell across multiple sessions. It’s particularly useful for managing remote Linux servers, as it ensures that any running command or shell output in your current SSH session will not be lost if you are to lose your network connectivity to the server. This article will show you how to install Screen on your web server and then use it to manage your SSH session.
Firstly, we’ll have to install it on your operating system, so SSH into your server as root and run the following commands.
On Redhat/CentOS:
yum install screen
On Debian/Ubuntu:
apt-get install screen
Now that it’s installed, let’s start a new screen session using the syntax ‘screen -s <screen-name>’:
screen -S remote
Once you’ve typed that, you will now be inside the screen session. This is basically just another shell on top of the one you were already in, but now we have a little bit more control over our session. For instance, we can now create multiple shells all within the single SSH session and move between them using keyboard shortcuts. Let’s start by creating a new shell.
At the command prompt, type ‘man screen’ so that you can recognise the shell you’re in (this will make more sense shortly). Without closing the current man page, let’s create create a new screen by using the following keyboard shortcut:
Ctrl A+C (Press Ctrl+A together, then let go and press C) (C stands for Create)
You should now see a new shell prompt that will look slightly different than the previous one, as it no longer has man page on the screen. If you want to get back to the previous screen so that you can check the man page, use the following shortcut:
Ctrl A+N (N stands for Next)
You should now find yourself back on the first screen with the man page still open and active. You can create as many screens as you like using the Create shortcut and then flick through them in order using the Next shortcut. To exit or close a particular screen, just logout from that shell with the ‘exit’ command or with the shortcut Ctrl+D.
So now we have screen running with one or more shells inside it. If you want to logoff the server entirely, but leave your sessions active, use the following shortcut:
Ctrl A+D (D for Detach)
This will log you out of the screen session and output something like the following:
[detached from 12504.remote]
This means that any shells or processes that were running inside screen are still active.
If you want to connect back into a screen which is already running on the server, first use the following command to check what’s running.
screen -ls
Which should produce output similar to the following:
There is a screen on:
12504.remote (13/11/12 10:00:13) (Detached)
1 Socket in /var/run/screen/S-dt.
We can now see the detached screen we created called ‘remote’. To restore the session, use the following command:
screen -r remote (where remote is the screen name)
There you go, you’re now back into your screen session exactly where you left it!
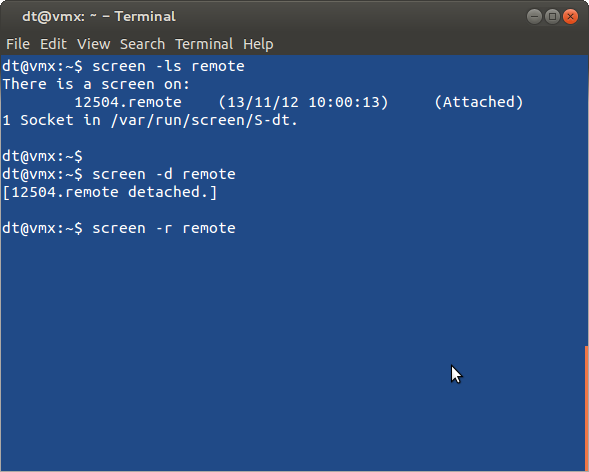
As a final note, every now and then you may be logged in to a screen session when you lose network connectivity to your server or your SSH connection hangs. In this case, you may log back in to the server and run ‘screen -ls’ only to find the screen is still attached:
There is a screen on:
12504.remote (13/11/12 10:00:13) (Attached)
1 Socket in /var/run/screen/S-dt.
When the screen is still attached, it won’t let you restore it. So in order to detach it, you’ll need to run the following command:
screen -d remote
Now the screen is detached again, you can simply restore the session as normal with screen -r <screen-name>
Enjoy!
.
| Hosting Options & Info | VPS | Web Solutions & Services |
|---|---|---|